If you've been putting off cleaning the block paving on your driveway or patio, you're not alone. It's one of those jobs that's easy to ignore until the surface has turned so green and grimy that it's genuinely slippery underfoot. This guide walks through how to clean block paving properly — the prep, the products, the pressure washing technique, and the re-sanding that most people skip and then wonder why the weeds are back within a month. Whether you're planning to do it yourself or trying to work out whether it's worth calling someone in, the steps are the same.
Block paving is one of the more forgiving hard surfaces to clean, but it does have quirks. Get the method wrong and you can end up with patchy results, blasted-out joints, and a surface that looks worse in places than when you started. Get it right and a tired, blackened driveway can look close to new. This guide gives you the honest version — including where DIY has real limits.
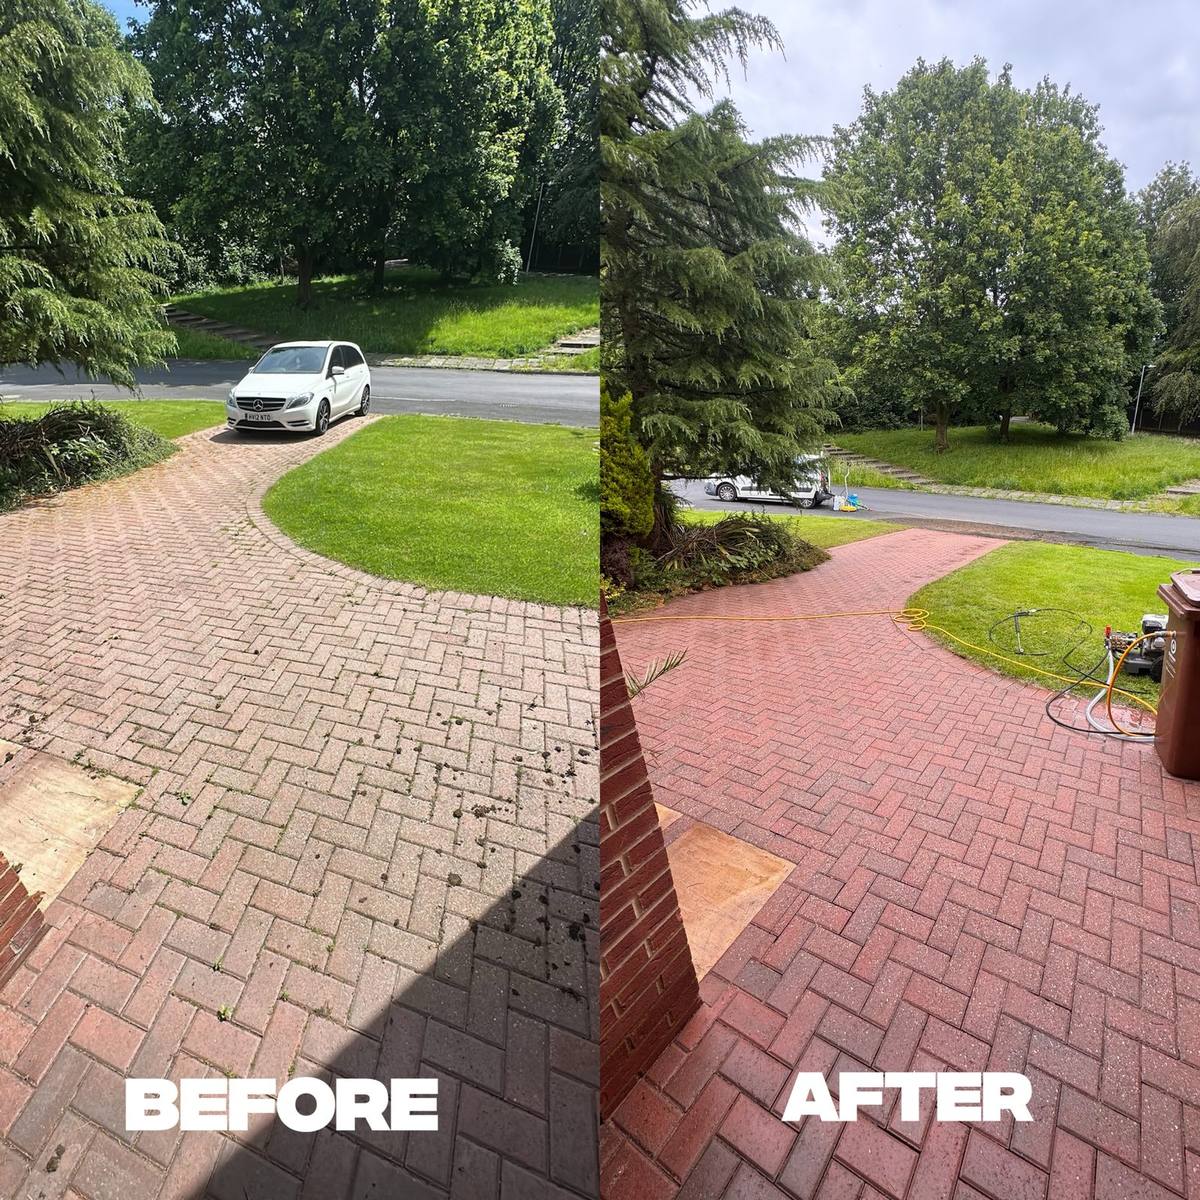
Before and after: red block paving driveway cleaned by C&C Precision, Oldham.
Quick answer: To clean block paving properly, remove weeds and loose debris first, apply a suitable pre-treatment or weed killer, then pressure wash using a rotary surface cleaner in overlapping passes. Finish by re-sanding the joints with kiln-dried sand to prevent future weed growth and restore stability.
What Makes Block Paving Go Dirty?
The main culprits are algae, moss, lichen, and general atmospheric grime that builds up in the porous surface of the blocks. In Greater Manchester, where months can go by without a dry spell, algae and moss establish themselves fast — particularly on north-facing driveways that get little direct sun. The surface stays damp, spores land, and within a season or two you can go from a clean driveway to something that looks like a garden path through a woodland.
Weeds in the joints are a separate problem. The jointing sand between blocks breaks down over time, and once there are gaps, weed seeds get in and root down. Oil stains from parked vehicles soak into the block surface and oxidise, turning from fresh spills into dark, ingrained patches that are resistant to standard cleaning. These are the stains where expectations need to be managed — even with professional equipment and chemical treatment, old oil stains often lighten significantly rather than disappear entirely.
The longer paving is left, the harder the job becomes. A driveway that hasn't been cleaned in five or six years will have moss roots penetrating the surface, algae deeply embedded in the texture of the blocks, and jointing sand that's almost entirely gone. It's not unrecoverable, but it takes more time, stronger chemistry, and sometimes a second pass to get a genuinely good result.
What Equipment and Products Do You Actually Need?
To clean block paving to a decent standard, you need a pressure washer capable of reaching at least 150 bar. The domestic electric washers sold in DIY sheds typically run at 100 to 130 bar — they'll shift surface dirt and light algae, but they struggle with anything that's been building up for more than a year or two. A petrol-powered machine in the 200 to 250 bar range is what most professionals use, and the difference in results is noticeable.
More important than the pressure washer itself is the rotary surface cleaner attachment. This is a spinning head that sits flat on the surface and distributes water pressure evenly across a circular path. Without it, you're using a lance — which creates obvious lines and streaks across the blocks and tends to blast jointing sand out unevenly, leaving some joints stripped and others untouched. If you're hiring or buying equipment specifically for this job, the surface cleaner is not optional.
Beyond the machine, you'll want a stiff-bristled brush, a pre-treatment solution or proprietary block paving cleaner, a weed killer or biocide if moss is present, and kiln-dried jointing sand for afterwards. Some jobs benefit from a sealer applied after cleaning, though that's a separate decision worth thinking through carefully — sealers vary a lot in quality and some can leave paving looking plasticky if you choose the wrong type.
Step 1 — Clear the Surface and Treat Weeds First
Before any water touches the surface, clear everything off it — bins, plant pots, cars if possible, anything that's been sitting in one spot long enough to leave a shadow stain. Then work along the joints and pull out any visible weeds by hand or with a weeding tool. This matters because pressure washing weeds rather than removing them first tends to spread seeds across the whole surface, and you'll see new growth coming up everywhere within weeks.
If there's significant moss or algae coverage, apply a moss killer or biocide treatment and leave it to work before you start washing. Dwell time varies by product, but most need at least 24 to 48 hours to kill the growth down to the root. Trying to pressure wash live, dense moss without treating it first just scatters it — some of it comes up, some of it doesn't, and you're left with a patchy result. The pre-treatment step adds time to the job but it's what separates a thorough clean from a surface rinse.
Skipping the prep stage is the most common reason DIY block paving cleaning produces disappointing results. A pressure washer is a cleaning tool, not a shortcut around proper preparation. Take the time at the start and the washing stage becomes significantly easier and more effective.
Step 2 — Apply a Pre-Treatment or Detergent
For lightly soiled paving, you can go straight to washing after the prep stage. But if the blocks are heavily stained, covered in algae, or carrying years of ingrained grime, a cleaning agent applied before washing makes a real difference. Proprietary block paving cleaners and diluted detergent solutions help break down the bond between the dirt and the block surface, making it far easier to lift during the wash. Apply it with a garden sprayer or a brush, work it into the surface, and let it dwell for the time specified on the product — typically 10 to 20 minutes.
Be careful about runoff. Cleaning chemicals — including domestic products — should not be allowed to run directly into drains or onto lawn areas. Try to contain the application to the paving itself and rinse with water directed away from planted borders. If you're working near a drain, a drain cover or some old towels across the grate will reduce the amount of chemical reaching the drainage system.
It's worth knowing that professionals have access to stronger formulations than anything sold over the counter — higher-concentration surfactants and biocides that cut through heavy contamination more effectively and with shorter dwell times. This is one of the genuine advantages of a professional clean for badly neglected paving, not just the equipment.
Step 3 — Pressure Wash With the Right Technique
Fit the rotary surface cleaner to your pressure washer and work across the paving in overlapping passes, treating it like mowing a lawn — consistent, methodical, no rushing. Keep the head at an even height from the surface (most are self-regulating to some degree, but make sure it's sitting flat) and maintain a consistent walking speed. Moving too fast leaves patches behind; moving too slowly can damage softer or older blocks and blasts out more sand than necessary.
Don't be tempted to switch to the lance for stubborn spots in the middle of the job — if a patch isn't coming clean with the surface cleaner, it usually needs more chemical treatment rather than more direct pressure. Using a narrow lance at close range on block paving is one of the most reliable ways to strip the surface texture off the blocks and create an uneven, patchy appearance that you can't reverse. If you want to read more about where pressure washing can go wrong, the guide on whether pressure washing can damage your paving covers this in more detail.
Work in sections if the driveway is large, and keep the washed sections damp while you finish the rest — letting one area dry out completely while you're still working on another can leave tide marks across the surface. Once you've covered the whole area, do a final rinse to flush loosened debris off the surface and out from between the joints.
Step 4 — Re-Sand the Joints After Cleaning
This is the step that most people skip, and it's the reason their block paving looks good for two months and then starts to deteriorate again. Pressure washing — even done carefully with a surface cleaner — removes jointing sand from between the blocks. Some joints will be almost empty after a thorough clean. If you leave them like that, the blocks have nothing locking them in place, weeds get in fast because there's no resistance, and the structural integrity of the surface starts to go. Re-sanding isn't a finishing touch, it's part of the job.
Use kiln-dried sand — not building sand, not sharp sand. Kiln-dried sand is fine, dry, and free-flowing, which means it brushes down into the joints easily and settles properly. Pour it across the dry surface and work it into the joints with a stiff brush, sweeping in multiple directions. Then compact the surface by walking over it or using a plate compactor if you have access to one, and repeat — the joints will settle and you'll need to add more sand than you expect. Keep going until the joints are consistently full to just below the block surface.
The paving needs to be fully dry before you sand — damp blocks hold moisture in the joints and wet sand won't flow freely. If you're cleaning on a damp day, you may need to come back the following day to sand. For driveways that have been heavily cleaned or where the joints were very depleted, a professional re-sanding service is worth considering separately if the scale of the job is beyond what a few bags of sand will fix.
Always let the surface dry completely before applying kiln-dried sand — even slightly damp joints will cause the sand to clump rather than flow into the gaps. On a typical overcast Greater Manchester day, allow at least four to six hours after washing before you sand, or ideally leave it overnight.
When Is It Worth Calling a Professional?
If the paving hasn't been touched in three or more years, has heavy moss or algae coverage, carries oil staining, or covers a large area — a full driveway rather than a small patio — the honest calculation often comes down in favour of getting a professional in. Hiring a decent pressure washer, buying the right attachments, purchasing chemical treatments and kiln-dried sand, and spending a full day on the job starts to approach the cost of professional cleaning once you factor it all in. Current rates for block paving cleaning run from around £3.50 per square metre for a straightforward clean, £4.25 per square metre with chemical pre-treatment included, and around £5.50 per square metre for a full restoration including re-sanding. Re-sanding alone, if the paving is already clean, is around £2.00 per square metre.
There are also jobs where professional equipment and chemistry simply produce better results than DIY is capable of — particularly where there's heavy lichen, deeply embedded algae, or oil staining that needs repeated treatment. That's not a criticism of anyone doing their own maintenance; it's just an honest reflection of what a 250 bar petrol machine with commercial-grade detergents will do compared to a domestic setup. C&C Precision Precision Washing covers the whole of Greater Manchester, and quotes are straightforward — send photos over WhatsApp and you'll get a price back quickly without needing a site visit in most cases.
If you're dealing with a patio rather than a driveway, the same principles apply — see the guide on how often patios should be cleaned for a realistic maintenance schedule. And if slippery paths are a concern alongside the driveway, the guide on cleaning slippery garden paths safely is worth reading alongside this one.
Quick Recap: Do It Right or Don't Bother
Block paving cleaning done properly follows a clear sequence and there's no shortcut through any of it. Rushing or skipping steps doesn't save time in the long run — it just means the job needs doing again sooner, or it never looks quite right in the first place.
- Prep: Clear the surface, pull out weeds, apply biocide or moss treatment and allow full dwell time
- Pre-treat: Apply cleaning solution to heavily stained areas and allow it to work before washing
- Wash: Use a rotary surface cleaner at consistent speed and height, overlapping passes, no lance on the block surface
- Re-sand: Once the surface is fully dry, brush kiln-dried sand into the joints until consistently full — repeat as needed
- Maintain: A light treatment with a diluted biocide once a year keeps moss and algae from re-establishing quickly and makes the next full clean much easier
If you're going to do the job, do it with the right equipment and the right sequence. A half-done clean — washing without pre-treatment, or washing without re-sanding — tends to look good for a few weeks and then deteriorates in a way that's frustrating. Either commit to doing it properly or get a quote and let someone else take on the full job.
Frequently asked questions
Can I clean block paving with a regular garden hose?
A garden hose won't have enough pressure to lift ingrained dirt, algae, or moss from block paving — it'll just wet the surface. You need a pressure washer running at 150 bar or more, ideally with a rotary surface cleaner attachment to avoid streaking and protect the jointing sand.
How often should block paving be cleaned?
In a wet climate like Greater Manchester's, a thorough clean every one to two years is realistic for most driveways. If you have overhanging trees, a shaded north-facing aspect, or heavy vehicle use, you may need it done annually to stay on top of moss, algae, and staining.
Do I need to re-sand block paving after cleaning?
Yes — pressure washing flushes out the jointing sand between the blocks, and if you don't replace it the blocks start to rock, weeds establish themselves faster, and the surface loses its structural integrity. Brushing in kiln-dried sand after every deep clean is not optional, it's part of the job.
Will pressure washing damage my block paving?
Done correctly, no. The risk comes from using too narrow a lance at too close a range, which can erode the surface of the blocks and blast out all the jointing sand unevenly. A rotary surface cleaner distributes the pressure evenly and is far less likely to cause damage — it's what professionals use.
Want a professional clean instead?
Send a photo of your block paving on WhatsApp and we'll get you a fast, no-fuss quote — usually within the hour.