Slippery garden paths are one of those problems that creep up gradually. The path looks the same as it always has, maybe a little greener or darker than it was, but it's not until someone's foot goes from under them that the urgency registers. If you've been meaning to clean slippery garden paths around your home, this guide walks you through why it happens, what actually fixes it, and how to stop it returning within a few months.
The answer is rarely as simple as getting the hosepipe out. What makes paths genuinely dangerous is biological growth — algae, moss, lichen and the thin biofilm they leave behind — and water alone won't shift it. This guide covers the right approach for the most common path surfaces, with honest notes on where DIY has its limits.
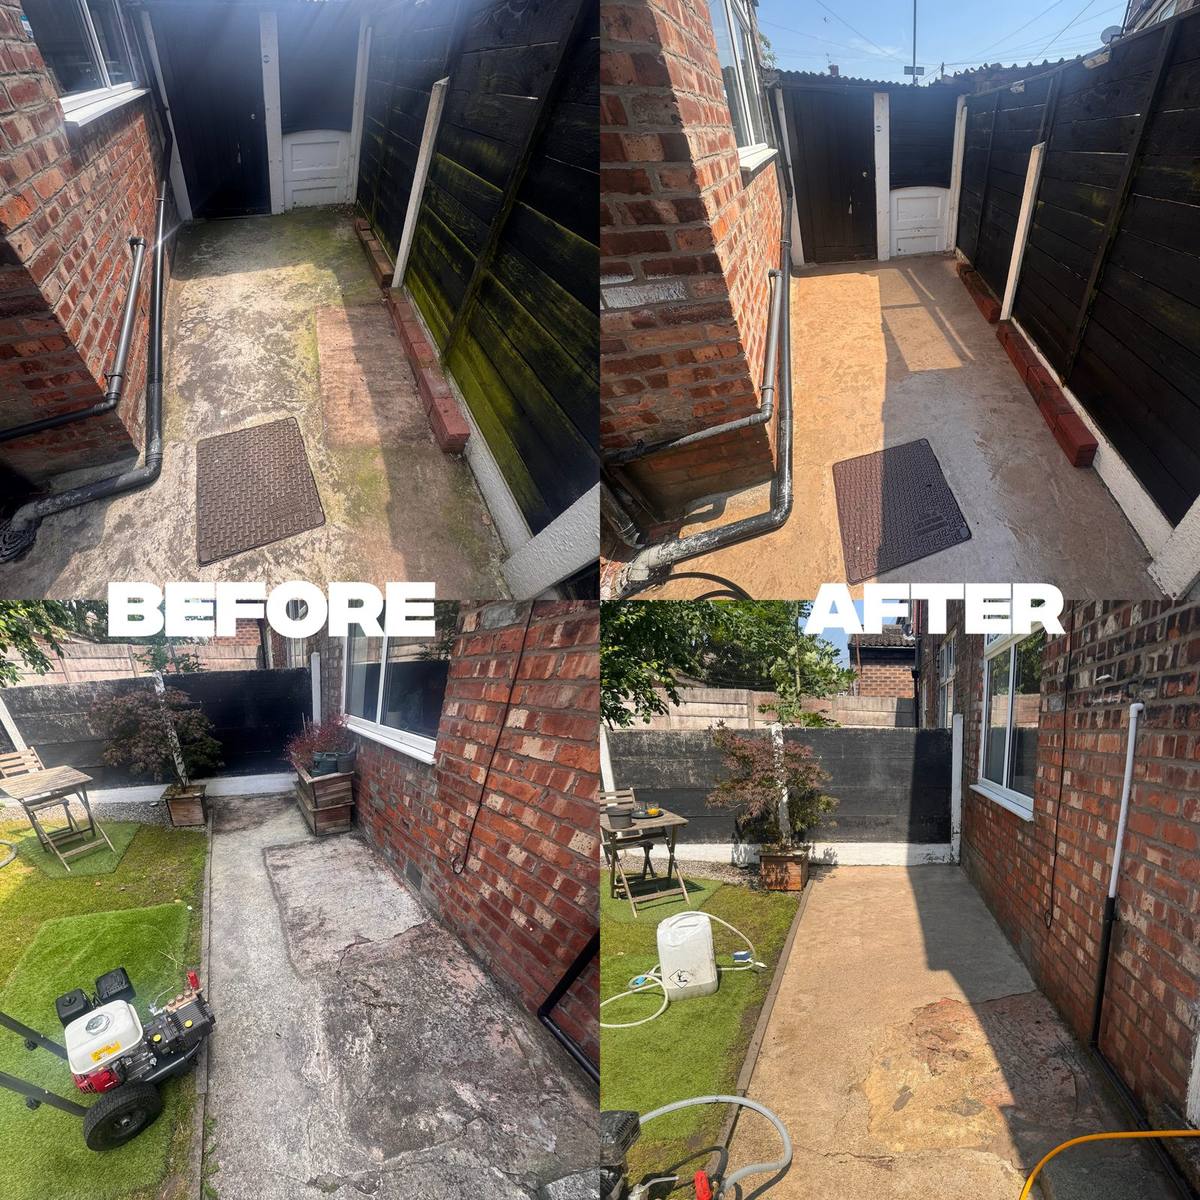
A typical side path in Greater Manchester — slippery algae cleared back to a safe, clean surface.
Quick answer: To clean slippery garden paths safely, remove loose debris first, then apply a dilute biocide or softwash solution to kill algae and moss at the root. Follow with pressure washing or a stiff brush. Treating the biological growth — not just blasting the surface — stops it coming back within weeks.
Why Garden Paths Get Slippery
The culprit is almost always biological, not just dirt. Algae, moss, lichen and a near-invisible substance called biofilm colonise damp surfaces and produce a layer that becomes extraordinarily slippery when wet. Biofilm in particular is deceptive — it can make a path feel like ice long before any visible greening appears. It grips the surface at a microscopic level, which is why a quick rinse with a hose does almost nothing to remove the hazard.
In Greater Manchester and across the North West generally, the conditions for this kind of growth are almost ideal for most of the year. High rainfall, overcast skies and mild temperatures mean surfaces stay damp for extended periods. Paths that face north or sit in the shadow of a house, fence or mature tree are especially vulnerable because direct sunlight — which would otherwise slow biological growth — rarely reaches them long enough to dry things out.
Lichen is worth mentioning separately because it's the hardest to shift. Unlike algae, which sits on the surface, lichen bonds directly to the substrate. On older paths in shaded corners, you'll sometimes find it has been established for years. It responds to treatment but takes longer than algae, and some staining will remain even after a thorough clean — that's worth knowing before you start rather than after.
Which Path Surfaces Are Most at Risk
Not all surfaces behave the same way. Smooth concrete flags tend to shed water reasonably well and, while they certainly grow algae, they're generally less problematic than more porous materials. Indian sandstone, limestone and other natural stones are much more absorbent — moisture sits in the pores and biological growth takes hold faster and goes deeper. Old or worn block paving presents a similar picture, particularly where the jointing sand has degraded and water is finding its way into the base.
Tarmac paths are often overlooked but they do grow algae, especially in sheltered spots. The surface texture gives biological growth plenty to grip. Gravel paths are a slightly different case — the loose surface means slipperiness is less of a concern, but moss and weed growth between stones is common and can eventually destabilise the path itself. For patio cleaning and path cleaning on natural stone, the approach needs to be gentler than it would be on concrete, and that applies equally to flags used as path surfaces.
Porcelain and ceramic pavers are relatively low-maintenance by comparison — their dense, non-porous surface doesn't absorb moisture or hold biological growth as readily. They can still grow a surface film and become slippery, but they respond well to cleaning and don't suffer the same ingrained staining that natural stone does.
What You'll Need Before You Start
Before any water touches the path, sort your equipment. You'll need a stiff-bristle brush — not a wire brush, which can scratch softer surfaces — a garden sprayer capable of applying liquid evenly, a biocide or a diluted sodium hypochlorite solution, protective gloves and eye protection, and a hosepipe or pressure washer for the rinse. If you're using a pressure washer, a rotary surface cleaner attachment gives a much more even result than a single lance on paving surfaces.
The most important thing to understand is the order of operations: you treat the biological growth first, then you clean. Skipping the biocide step and going straight to pressure washing will lift some of the surface growth but leave the root structures intact. The path will look better briefly, then go green again within weeks. A biocide or bleach-based solution needs to be applied, left to dwell — typically 15 to 30 minutes on a mild day, longer in cold weather — and only then agitated or rinsed off.
Sodium hypochlorite is the most effective treatment for killing algae, moss and lichen on garden paths, but it needs to be diluted correctly — typically between 2% and 5% for path surfaces — and kept off surrounding plants and grass. Wet planted borders thoroughly before you start and rinse them again after to limit any bleaching effect on vegetation.
Step-by-Step: How to Clean a Slippery Garden Path
- Clear loose debris. Sweep away leaves, soil, moss clumps and any loose material with a stiff brush. This lets your treatment reach the surface rather than sitting on top of organic matter.
- Apply biocide or diluted sodium hypochlorite. Use a garden sprayer to apply the solution evenly across the whole path. Don't rush this step — coverage matters.
- Allow to dwell. Leave the solution to work for at least 15–30 minutes. On thick moss or well-established lichen, up to an hour is reasonable. You're not waiting for it to look clean; you're letting the chemistry kill the growth at root level.
- Agitate with a brush or pressure washer. Work the surface with a stiff brush or, if using a pressure washer, keep the lance at least 20–30cm from the surface with a fan nozzle. On softer stone, increase that distance or reduce the pressure setting. Avoid pencil jet nozzles on any paved surface — they concentrate force into a small point and will damage the material or erode jointing.
- Rinse thoroughly. Work the rinse water away from planted areas and off the path completely. Leaving biocide residue isn't harmful to the path, but a good rinse gives you a cleaner result.
- Allow to dry fully before assessing. Many stains that look permanent when wet become less obvious as the surface dries. Some deep lichen staining will remain — that's normal, and doesn't mean the path is still unsafe.
How to Stop the Slipperiness Coming Back
Cleaning removes the immediate hazard, but on its own it's a temporary fix in a wet northern climate. If the underlying conditions haven't changed — shade, poor drainage, overhanging vegetation — biological growth will re-establish within months. The question is what you do after cleaning to extend that window.
A path sealer is the most effective option for concrete and natural stone surfaces. A good penetrating sealer doesn't make the surface waterproof, but it reduces moisture absorption significantly, which makes it harder for algae and moss to get established. Some sealers include anti-slip additives or have a matt finish that maintains grip when wet. On block paving specifically, sealing also helps retain jointing sand, which tends to wash out over time and creates gaps that encourage weed and moss growth. If the jointing sand is already degraded, it's worth looking at block paving re-sanding before or alongside sealing.
Beyond treatments, look at the physical causes. Cutting back overhanging shrubs or tree branches lets more light and airflow reach the surface. Improving the drainage gradient — even slightly — reduces the time the surface stays wet after rain. These aren't always straightforward changes, but they make a real difference to how quickly the problem returns.
When to Call a Professional Instead
DIY cleaning works well on smaller paths in reasonable condition where the surface material is forgiving — concrete flags and most block paving fall into that category. There are situations where it's not the right tool, though, and it's worth being honest about that rather than having someone spend a day on a job that needs a different approach.
Large areas are the most obvious case. Cleaning a long path or a series of paths connecting a garden manually is exhausting and time-consuming, and the results are often uneven. Delicate surfaces — Indian sandstone, natural slate, old sandstone flags — respond badly to high-pressure water, which can lift the surface layer, erode pointing or cause permanent pitting. Softwashing with a low-pressure sodium hypochlorite application is the safer method for these materials, and it kills biological growth more thoroughly than pressure washing because the chemistry does the work rather than the mechanical force.
If the path serves a household with elderly residents or anyone with limited mobility, the risk calculus changes. A slippery path isn't just inconvenient — it's a genuine fall hazard, and getting it sorted properly rather than partially is worth the cost. C&C Precision Precision Washing covers Greater Manchester including Oldham, Rochdale, Bury, Bolton, Tameside and Stockport, and quotes are straightforward — send photos over WhatsApp and you'll get a price back quickly without a site visit in most cases. For more on how that process works, the guide on how exterior cleaning quotes actually work is worth a read.
Key Takeaways for Safer Garden Paths
The single most important thing to take from this is that you need to treat the biology, not just the surface. Pressure washing without a biocide pre-treatment is better than nothing, but the growth comes back fast because you haven't killed what's causing it. Dwell time matters — the temptation is to apply the solution and start scrubbing immediately, but giving it time to work is what separates a lasting result from a short-term improvement.
After cleaning, seal if you can, and address any physical factors — shade, drainage, overhanging plants — that are keeping the surface damp. Then check the path again in autumn, when algae growth accelerates as temperatures drop and rain increases. Greater Manchester's climate means October through February is the period when paths deteriorate fastest, and a light biocide application in early autumn can meaningfully reduce how much work is needed the following spring.
If you're dealing with natural stone, significant lichen ingrowth or a large area, the DIY vs professional pressure washing guide sets out the trade-offs clearly and honestly. And if your path connects to a wider paving area, reading up on patio cleaning costs beforehand will give you a realistic sense of what professional work involves.
Frequently asked questions
What makes a garden path slippery even when it looks clean?
A thin, near-invisible biofilm of algae is often to blame — it forms on any damp surface and is extremely slippery underfoot even when it hasn't yet turned visibly green or black. Simply hosing the path won't remove it because the organisms grip the surface. You need a biocide or sodium hypochlorite solution to kill the growth before cleaning.
Is it safe to pressure wash a garden path yourself?
For concrete flags or block paving, yes — provided you keep the lance at the right distance and use a fan nozzle rather than a pencil jet. For softer or more porous materials like Indian sandstone, natural slate or old mortar joints, high-pressure water can cause surface damage and erode pointing. If you're unsure about your surface, a professional with a rotary surface cleaner and appropriate pre-treatment is the safer option.
How often should garden paths be cleaned to stay safe?
In Greater Manchester's wet climate, most paths benefit from a full clean every one to two years. North-facing paths or those under trees may need attention annually. A light brush and a biocide spray applied in autumn can extend the time between deep cleans and keep surfaces safer through the worst of the winter months.
Will a professional clean stop my path being slippery long-term?
A professional clean removes the existing biological growth far more thoroughly than DIY methods, which gives you a much longer window before regrowth. Applying a path sealer after cleaning creates a less hospitable surface for algae to take hold again. That said, no treatment is permanent — in a damp northern climate you should expect to maintain paths every couple of years.
Got a slippery path you want sorted?
Send a photo of your path on WhatsApp and we'll come back with a fast, honest price — no fuss.