If you've ever watched someone hire a pressure washer for the weekend and go at their driveway like they're removing paint from a battleship, you'll understand why the question of whether pressure washing can damage paving comes up so often. The honest answer is yes, it absolutely can — but in most cases it doesn't have to. The difference between a clean that refreshes a surface and one that quietly ruins it usually comes down to technique, the right equipment and knowing what you're actually dealing with before you start.
Greater Manchester's damp climate means that algae, moss and black spot build up faster here than in drier parts of the country. Drives and patios in Oldham, Rochdale and Bury are often cleaned under pressure without much thought given to the surface type, the condition of the jointing, or whether chemical pre-treatment might do most of the work first. That's where the problems start. This guide covers what actually causes damage, which surfaces are most vulnerable, and how a proper clean should be done whether you're doing it yourself or bringing someone in.
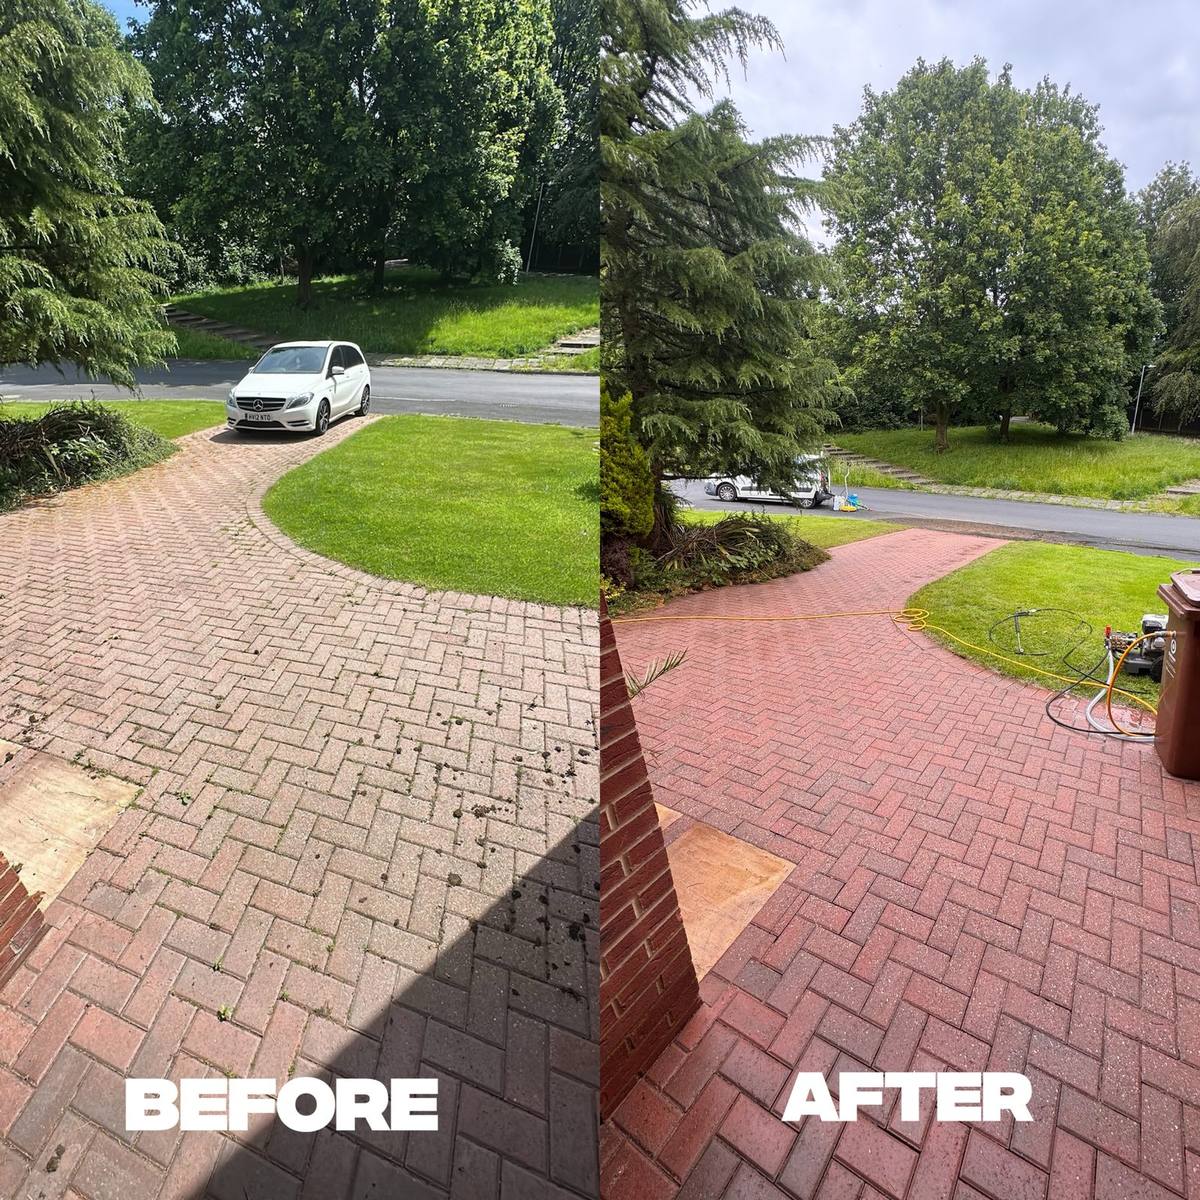
Before and after: red block paving cleaned by C&C Precision in Greater Manchester without disturbing the joints or surface.
Quick answer: Yes, pressure washing can damage paving if the wrong pressure, nozzle or technique is used. High PSI can erode pointing, strip joint sand, pit soft stone and etch block paving. Used correctly — right pressure, a rotary surface cleaner and proper pre-treatment — it cleans safely without causing harm.
The Short Answer: It Depends on Who's Doing It
Pressure washing done correctly is safe for the vast majority of paving surfaces. The process has been used professionally for decades, and when it's done with the right equipment settings, the right nozzle and a bit of preparation beforehand, it cleans without harming the material underneath. The damage happens when those variables go wrong — and with hired consumer machines and no experience reading a surface, they often do.
A DIY machine from a hire shop can push out anywhere from 1,500 to 2,500 PSI depending on the model, and most people run them at full power because that's what seems to shift the dirt quickest. A professional uses a variable-pressure machine and dials it to suit the surface — lower for soft sandstone, higher for dense porcelain, something in the middle for most block paving. That calibration makes a significant difference to what happens to the surface over time.
The other factor is pre-treatment. A professional applies a chemical solution — typically a biocide or sodium hypochlorite mix — and lets it dwell for ten to twenty minutes before any pressure is used. That dwell time lets the chemistry break down algae, moss and organic staining at a molecular level, which means the pressure washing stage needs far less force to rinse the surface clean. Skip that step and you're compensating with pressure, which is where surfaces start to suffer.
What Actually Causes Damage When Pressure Washing Paving
The single biggest cause of damage is excessive PSI applied too close to the surface. A pencil-jet or zero-degree nozzle concentrates the full force of the water into a tiny point, and dragging that across soft stone or old pointing will score and etch the surface visibly. Even a slightly too-aggressive fan nozzle used at close range can do similar damage over a large area — the pitting is just more even, which makes it less obvious until the surface dries and the light catches it.
Mortar pointing around older paving slabs is particularly vulnerable. The pointing between flags and around the perimeter of patios is often the oldest and most weathered part of any paved surface — and directing full pressure straight into those joints will blast it out. Once the pointing goes, water gets underneath and in a North West winter that freeze-thaw cycle starts lifting slabs from below. What looked like a clean patio in September can be a rocking, uneven one by spring.
The third culprit is not pre-treating at all. Without a chemical pre-treatment to loosen organic growth first, the operator has to use more pressure and more passes to get the same result. Each additional pass adds cumulative stress to the surface, particularly on anything porous or older. Pre-treatment isn't an optional extra — it's what makes lower, safer pressures work.
Which Paving Surfaces Are Most at Risk
Indian sandstone is probably the surface that gets damaged most often. It's one of the most popular paving materials in Greater Manchester gardens, and it looks beautiful when it's clean — but it's a relatively soft, porous stone that erodes under sustained high pressure. The correct approach for sandstone is a low-pressure chemical clean rather than a full-force wash. You can read more about the specific considerations in our stone cleaning guide, but the short version is: less pressure, more chemistry, longer dwell time.
Older concrete flags — the grey or buff slabs common on driveways laid in the 1980s and 90s — can also be sensitive once the surface has weathered. New concrete is dense and hard, but after twenty-plus years of Pennine weather the surface layer can be more friable. Using a rotary surface cleaner at a moderate pressure is usually fine, but a direct lance at close range can etch them. Weathered mortar-pointed slabs carry the same risks as described above.
Porcelain paving sits at the other end of the scale. It's a vitrified, non-porous material that can handle higher pressures without surface damage, which is why it's often the easier surface to clean. Block paving — concrete or clay — is generally robust too, but it has its own specific issue with joint sand that we'll cover separately. The key point is that there's no single pressure setting that works safely across every surface type.
Block Paving: The Joint Sand Problem
Pressure washing block paving almost always displaces some kiln-dried joint sand from between the blocks, and how much depends entirely on how it's done. Even at controlled, professional pressures, water force will remove some sand from the upper joints over successive cleans. At full DIY-machine power it can strip them down to almost nothing in a single session. This matters more than most people realise until the problems show up later.
Joint sand is what locks the blocks together and gives the surface its structural integrity. Without it, individual blocks start to rock and shift under vehicle weight, water drains straight down through the joints instead of running off the surface correctly, and weeds find easy purchase in the gaps. If you want to understand more about that last problem specifically, the guide on how to remove weeds from block paving covers it in detail. The fix after any block paving clean is straightforward: re-sand the joints with fresh kiln-dried sand once the surface is fully dry, and brush it in properly.
Sealing is worth considering at that point too, particularly for driveways that take regular vehicle traffic or patios in heavily shaded spots where algae returns quickly. A quality penetrating sealer locks the new joint sand in place, slows future organic growth and makes the surface significantly easier to clean next time. It's not always necessary, but for block paving that's been properly cleaned and re-sanded it extends the results noticeably. Pricing for block paving work starts from around £3.50/m² for a straight clean, £4.25/m² with chemical treatment included, and £5.50/m² for a full restoration with re-sanding — re-sanding alone is around £2.00/m² if the surface is already clean.
How Professionals Avoid Damaging Paving
The most important tool in a professional's process isn't the pressure washer itself — it's the rotary surface cleaner. This is a dome-shaped attachment that houses two rotating jets inside a sealed shroud. Because the jets rotate and the shroud keeps them at a consistent distance from the surface, the cleaning action is even, controlled and much gentler than a lance. It also virtually eliminates the streaking and tramline marks that a handheld lance leaves on flat surfaces.
Before the machine even comes out, pre-treatment does the heavy lifting. A biocide or diluted sodium hypochlorite solution is applied to the surface and left to dwell — ten minutes for light contamination, up to twenty for heavy moss and algae. The active chemistry breaks down the organic matter at its root, so when the surface cleaner goes over it, lower pressure is sufficient to rinse everything clean. This is the same principle used in softwashing, where the chemical does the work and pressure is used for rinsing only rather than cleaning.
C&C Precision Pressure Washing works this way across all surface types — matching pressure to the material, pre-treating as standard and re-sanding block paving after cleaning as part of the process rather than an afterthought. It's a slower approach than going straight in with maximum pressure, but it's the difference between a surface that looks good for two or three years and one that looks worse than when you started.
When to Call a Professional Instead of DIYing It
DIY pressure washing makes sense for low-stakes jobs — rinsing down a garden path, cleaning a plastic fence panel, that kind of thing. For paving that represents a meaningful part of your property's kerb appeal or structural surface, the risks of getting it wrong are higher than most people account for. Hired machines are often unregulated in terms of pressure output, the nozzles included aren't always suited to paving work, and there's no real way to undo surface etching once it's done.
The scenario that causes the most damage is a homeowner hiring a machine, going at a driveway on full blast without pre-treatment, stripping all the joint sand, and then not re-sanding afterwards. The driveway looks clean for a few weeks, then the weeds push through the open joints, the blocks start to move slightly, and within a season or two it's in worse condition than before. If you're already thinking about a patio clean before putting your house on the market, there's a useful overview in our guide on clean paving before you sell.
A professional quote doesn't need a site visit — photos over WhatsApp give enough information to provide an accurate price for most jobs. If something is genuinely uncertain from photos alone, that's flagged honestly rather than quoted blind. There's no insurance implication either way with a professional clean: any accidental damage to your property is covered under public liability insurance. With a hired machine, you're carrying that risk yourself.
What to Check Before and After Any Paving Clean
Before any cleaning work starts, it's worth taking a few minutes to assess the surface properly. Check the condition of the joints — are they full of sand or mostly empty? Is there visible crumbling mortar around the edges of slabs? Are any blocks or slabs already rocking? If the answer to any of those is yes, that's useful information for whoever is doing the work, because it affects the pressure and technique used. A driveway cleaning job on a well-maintained surface is a different proposition to one where the substrate is already compromised.
After any block paving clean, let the surface dry completely before re-sanding — ideally 24 hours in dry weather. Brushing kiln-dried sand into damp joints doesn't compact properly and you'll lose a significant proportion of it to the first rainfall.
After cleaning, walk the surface carefully. Check that joints have been re-sanded where needed, look for any blocks that have moved or are sitting slightly proud of the surrounding surface, and check the perimeter pointing around any slabs. On a patio clean, look at the drainage too — water should be sheeting off the surface, not pooling. If it's pooling in new places after cleaning it may mean a block or slab has shifted slightly and needs bedding back down.
Sealing is the last question to consider. It's not right for every surface — some natural stone patinas better without sealant, and some homeowners simply prefer the look of unsealed paving. But for driveways taking vehicle traffic, or any surface in a heavily shaded spot that gets persistent algae, a good penetrating or wet-look sealer applied to a freshly cleaned surface makes practical sense. It won't make cleaning unnecessary in the future, but it does make the next clean quicker and the results longer-lasting.
Frequently asked questions
Can pressure washing remove the sand between block paving?
Yes, it almost always does to some degree. Even at controlled pressures, the force of water displaces kiln-dried joint sand over time. That's why a proper block paving clean should include re-sanding the joints afterwards — without it, weeds push through and blocks can start to shift.
Is it safe to pressure wash Indian sandstone?
It can be, but sandstone is a soft, porous material that's easily pitted or eroded at high pressure. The correct approach is a low-pressure chemical pre-treatment to lift algae and black spot, followed by gentle rinsing rather than a full-pressure blast. Getting this wrong can roughen the surface permanently.
Will pressure washing crack my paving?
Pressure washing itself is very unlikely to crack solid paving slabs. The more common risk is eroding mortar beds and pointing over time, which then allows water to get underneath and freeze in winter — that's what eventually causes cracking and lifting. Good technique avoids disturbing the bed and pointing.
How do I know if my paving has been damaged by pressure washing?
Signs include a rough, pitted surface texture that wasn't there before, missing or loose joint sand between blocks, crumbling or missing mortar pointing around slabs, and in worse cases, slabs that rock or have lifted slightly. Some of this is repairable — re-sanding, re-pointing — but surface etching to the stone itself is permanent.
Not sure if your paving can take pressure washing?
Send a photo of your paving on WhatsApp and we'll give you a straight answer and a fast quote — no obligation.