If your block paving driveway or patio is being slowly taken over by weeds pushing up through every joint, you're not alone. It's one of the most common complaints we hear from homeowners across Greater Manchester, and it makes sense — the damp climate here means organic matter breaks down quickly, joints lose their sand, and anything with roots finds the gaps very welcoming. The good news is that you can remove weeds from block paving properly and keep them away for a meaningful length of time, but only if you work through the problem in the right order. Skip a step and you'll be back to square one by the following spring.
This guide walks through the process from start to finish — killing the growth, clearing the joints, pressure washing correctly, and re-sanding so the problem doesn't just come straight back. It's worth reading to the end because the re-sanding part is where most DIY attempts fall short, and it's the step that makes the biggest difference to how long your results actually last.
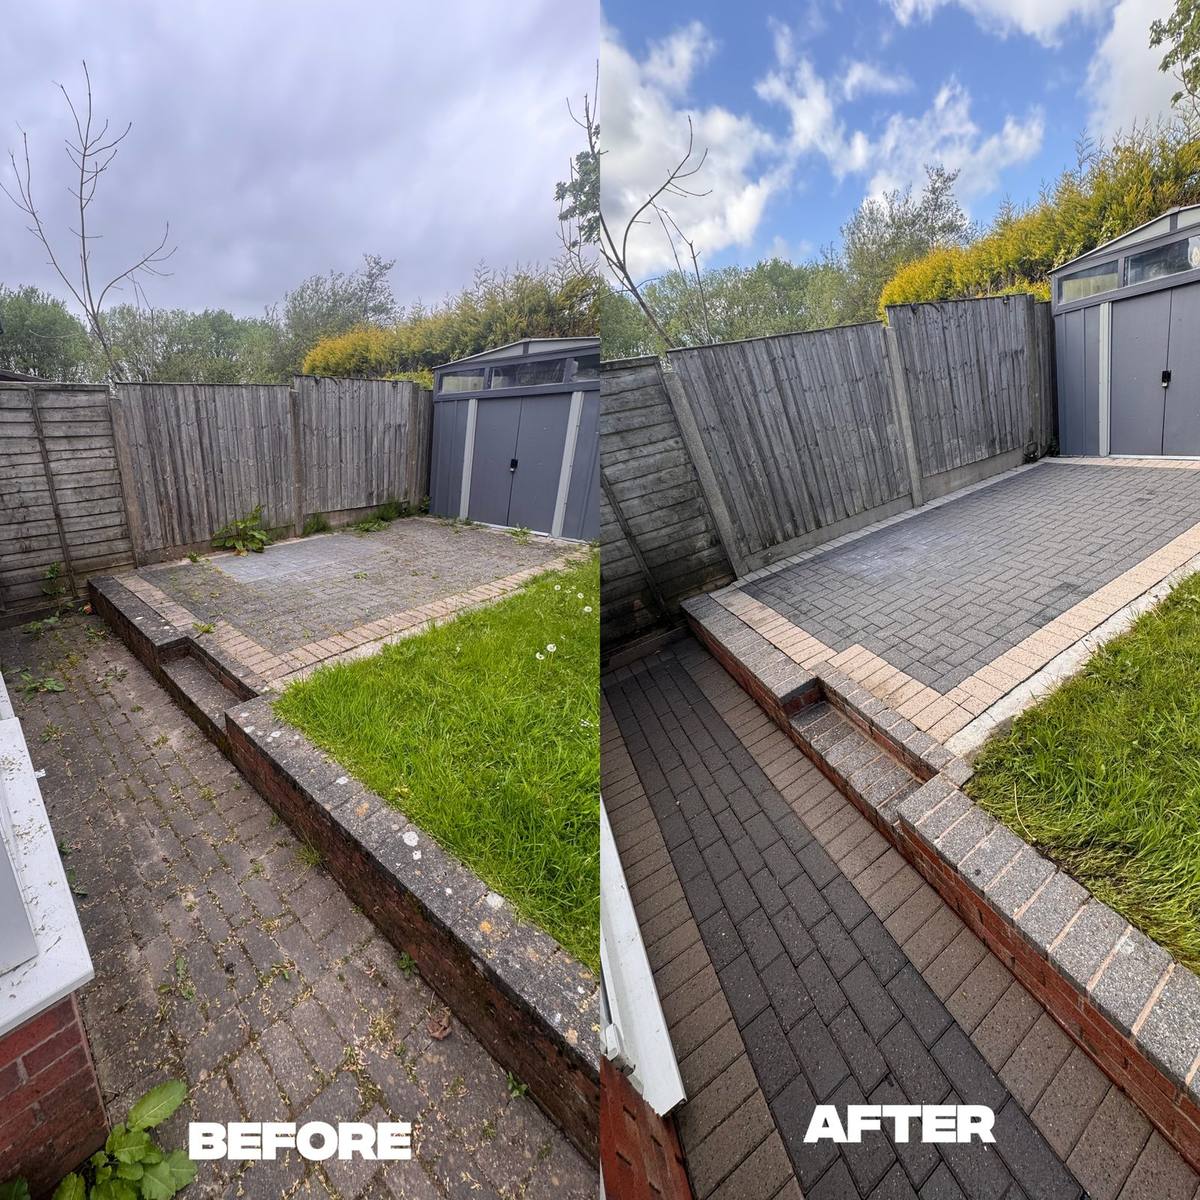
Rear block paving — heavy weed and moss growth cleared with a professional deep clean and re-sand.
Quick answer: To remove weeds from block paving, kill them first with a path weedkiller or dilute sodium hypochlorite solution, leave to die back, then pressure wash the joints clean. Finish by re-sanding with kiln-dried sand and applying a jointing compound or weed-resistant sand to stop regrowth.
Why Weeds Keep Coming Back in Block Paving Joints
Weeds don't grow up through solid concrete blocks — the blocks themselves aren't the problem. What happens is that the kiln-dried sand originally brushed into the joints gradually washes away or compacts down over time, leaving shallow, open channels that collect airborne seeds, soil particles, and moisture. Once a little organic matter builds up in a joint, seeds germinate easily, and the roots work their way deeper with each season.
In Greater Manchester the problem is accelerated by the weather. We get a lot of rain, and that rain does a steady job of flushing sand out of joints and carrying organic debris into them. A driveway laid in good condition can start showing meaningful weed growth within two or three years if the joints aren't topped up. By the time most people decide to tackle it, the joints are almost completely empty and the weeds have had several seasons to establish proper root systems.
The practical point is this: until you address the joints themselves, you're treating the symptom rather than the cause. You can pull weeds every summer and the result will be the same the following year. A proper fix means killing the growth, cleaning the surface thoroughly, and then filling those joints back up so there's no longer a hospitable gap for seeds to land in. If you're seeing other signs of joint failure — rocking blocks, sunken areas — it's worth reading the top signs your paving needs resanding before you start.
Step 1 — Kill the Weeds Before You Touch Them
The instinct is to get out there and start pulling, but removing weeds by hand without killing them first tends to make things worse. Established weeds have roots that go well below the joint surface, and pulling the top growth often snaps the stem and leaves the root behind to reshoot. On paving with shallow joints, it also disturbs the remaining sand and opens the joint up further.
A path weedkiller — the type specifically formulated for hard surfaces — applied on a dry day will kill off the top growth and work down into the roots over seven to fourteen days. Alternatively, a diluted sodium hypochlorite solution is effective against moss, algae, and annual weeds in joints, and has the added benefit of treating any biological growth on the block surface at the same time. Dwell time matters with either product: give it long enough to actually work before you move on to the next step. Rushing this stage means you'll be pressure washing live growth, which causes its own problems.
If there's significant moss and algae alongside the weed problem — which is common on north-facing driveways or patios under tree cover — a softwash treatment using sodium hypochlorite is a more thorough approach than a path weedkiller alone. You can read more about how that works on our softwashing page.
Step 2 — Clear the Dead Growth From the Joints
Once the weeds have died back and turned brown, the next job is getting the loose dead material out of the joints before you bring any water to bear on the surface. A stiff yard brush will shift surface debris, and a pointed joint scraper or an old kitchen knife works well for pulling dead growth out of individual joints. It's slow work on a large driveway, but it's worth doing.
The reason you don't want to skip this stage is that pressure washing over dead but intact root systems tends to push material sideways rather than out, packing it into neighbouring joints. On a large area, you can end up redistributing the problem rather than removing it. Dead annual weeds tend to come away cleanly; perennial weeds with thicker root systems may need a bit more effort to pull out fully.
This is also a good moment to assess the overall condition of the joints. If they're almost completely empty across the whole area, make a note — you're going to need more kiln-dried sand than you might think at the re-sanding stage, and it's better to have too much on hand than to run short halfway through.
Step 3 — Pressure Wash the Block Paving Properly
With the dead growth cleared, pressure washing can do its job properly. The most effective tool for this is a rotary surface cleaner attachment rather than a lance — it cleans evenly, doesn't create the stripe marks you get with a lance, and the rotating nozzles blast dead roots and old compacted sand out of the joints without concentrating the pressure on one spot long enough to damage the block face. This matters particularly on older or softer blocks.
Flow rate is where most consumer pressure washers struggle. A domestic machine from a hardware store typically produces around 6–8 litres per minute. A commercial-grade machine runs at 15–20 litres per minute or more, and that volume of water at the right pressure is what actually shifts compacted material out of joints cleanly. If you've hired or own a domestic machine and found that it's not shifting much from the joints, this is usually why. There's a more detailed look at this in our guide to whether DIY pressure washing is actually worth it.
After washing, rinse the surface down and let it dry fully before re-sanding. Brushing sand into damp joints means the sand clumps rather than settling into place, and you'll end up with an uneven result.
Step 4 — Re-Sand With Kiln-Dried Sand or Jointing Compound
This is the step that most DIY attempts either skip or underdo, and it's the main reason weeds come back within a season. Empty joints are an open invitation — they collect seeds, retain moisture, and give roots somewhere to go. Filling them properly removes all of that.
Kiln-dried sand is the standard material and works well on most residential paving. Pour it across the dry surface, work it into the joints with a stiff brush, and repeat until the joints are full to just below the chamfer on the block edge. A plate compactor run over the area beds everything in and helps the sand settle. For driveways or areas that take a lot of foot and vehicle traffic, a polymeric jointing compound is a better choice — it contains a binder that sets firm when activated by water, leaving a joint that's much harder for seeds to colonise and more resistant to washing out in rain. Full details on what's involved are on our block paving re-sanding page.
Don't re-sand onto damp blocks. Even if the surface looks dry after pressure washing, give it a full day in reasonable weather before brushing in kiln-dried sand — moisture in the joints causes the sand to bind and bridge rather than settle properly, and you'll end up with hollow-sounding joints that wash out at the first heavy rain.
Once re-sanded, the paving should feel solid underfoot with no rocking blocks. If you still have movement after re-sanding, the sub-base may need attention — that's a separate job and usually means lifting and re-laying affected sections.
When to Call a Professional Instead of DIYing It
If the joints are heavily compacted or almost entirely empty across a large area, the paving has lifted or settled unevenly, or several seasons of moss and algae have built up on the surface, a DIY clean is likely to deliver limited results. Consumer equipment simply doesn't move the volume of water needed to shift years of compacted organic matter from joints, and re-sanding a large driveway by hand is genuinely hard work — particularly if you're doing it after a full day of cleaning.
A professional clean, re-sand, and optional seal typically lasts several years rather than a single season, and the cost is more reasonable than most people expect. Block paving cleaning starts from around £3.50/m² for a standard clean, £4.25/m² with a chemical treatment included, and a full restoration with re-sanding runs from £5.50/m². Re-sanding alone on previously cleaned paving is from £2.00/m². For most residential driveways in Greater Manchester that works out to somewhere between £150 and £350 all in. If you want to understand how quotes are put together before you ask for one, the guide on how exterior cleaning quotes actually work is worth a look.
C&C Precision Precision Washing covers Oldham, Rochdale, Bury, Bolton, Manchester, Tameside, Stockport, and surrounding towns. Quotes are straightforward — send a couple of photos on WhatsApp and you'll usually have a price the same day, without needing a site visit for most standard jobs.
How to Keep Block Paving Weed-Free Long Term
Three habits make the biggest difference once the paving is clean and re-sanded. First, brush the surface regularly — a stiff broom every few weeks stops debris accumulating in joints and removes seeds before they have a chance to germinate. Second, treat new growth promptly with a path weedkiller rather than waiting for it to establish. An annual weed treated when it's an inch tall takes ten seconds and a quick spray; the same weed left until summer has roots three times as deep and takes real effort to shift.
Third, keep the joints filled. Top up with kiln-dried sand in autumn if you notice joints starting to look shallow — it's a ten-minute job with a bag of sand and a brush, and it's the single most effective preventative measure available. If you want to remove weeds from block paving for good rather than manage them season to season, a block paving sealant applied after a professional clean adds another layer of protection. It creates a surface that's less porous, harder for moss and algae to colonise, and significantly easier to clean. Sealed paving also tends to hold its colour better, particularly on older or faded blocks — there's more on that in the guide to how to restore faded block paving.
None of this is complicated, but it does require doing the steps in order. The damp climate in Greater Manchester means that organic growth will always find a way back given time — the aim is to make the conditions as unfavourable as possible and stay on top of it before it gets ahead of you again.
Frequently asked questions
What kills weeds in block paving permanently?
Nothing is truly permanent, but polymeric jointing sand or a resin-based jointing compound comes closest — it sets hard in the joints and leaves almost no room for seeds to germinate. Combined with a path weedkiller treatment once or twice a year, most driveways stay clear for several seasons.
Can I use bleach to kill weeds in block paving?
Sodium hypochlorite — the active ingredient in stronger bleach-based solutions — is effective at killing moss, algae, and weeds in joints, and it's what we use professionally in a diluted, controlled form. Household bleach from a supermarket is a lower concentration and won't always kill established roots. It can also discolour certain block colours if you're not careful with dilution.
Will pressure washing remove weeds from block paving joints?
Pressure washing will blast out a lot of dead and loose growth, but if you pressure wash live weeds you risk spreading seeds and making the problem worse the following season. Kill the weeds first, let them die back, then pressure wash. After cleaning, re-sand the joints or the weeds will return within months.
How much does it cost to have block paving professionally cleaned and re-sanded in Greater Manchester?
Most residential driveways in Greater Manchester come in between £150 and £350 for a full clean and re-sand, depending on size and condition. The quickest way to get an accurate price is to send a couple of photos on WhatsApp — we can usually quote the same day without needing to visit.
Got weeds taking over your block paving?
Send a photo of your driveway or patio on WhatsApp and we'll give you a fast, no-fuss quote for a professional clean and re-sand.